WCF Simple Example in Visual Studio 2010
This topic is covered in multiple posts
- Creating simplest solution with default endpoints (you’re reading it right now)
- Manually adding and configuring the endpoints
- More to come…
It’s been a long, long time since I wrote the original WCF Simple Example post. It was even before Visual Studio 2008 and since then, a lot of things changed. As still a lot of folks place comments and questions to that post, let’s have a look at what we currently have to do to get a service up and running and consume it in a client.
This time we’ll start with a class library assembly (a .dll) and we’ll host the service inside a console application. The client will use a Windows Forms application again. Although we do everything in Visual Studio 2010, most will be usable in VS2008. I will mention it when it isn’t and provide an alternative. I’ll be a bit more descriptive about what we have to do, so this post is a little longer than the original.
Create Project
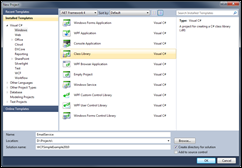
First create a new “class library”, this will become the implementation of our service. Choose New Project and select the Class Library as project template. At the bottom, set as name for the project “EmailService” and the solution name “WCFSimpleExample2010”. If you can’t set the solution name, check the Create directory for solution box.
Create the contract
We’ll first create the contract with only one method; or operation as they are called in WCF. The “class library” should have added a class called “Class1”, you should rename it to IEmailValidator.cs and make it an interface with the same name.
Now add a single method signature called ValidateAddress that takes one string argument called emailAddress and returns a boolean. This is a normal interface, nothing fancy and the end result is as follows:
public interface IEmailValidator { bool ValidateAddress(string emailAddress); }
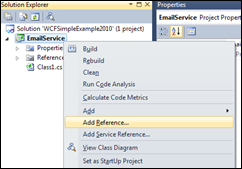
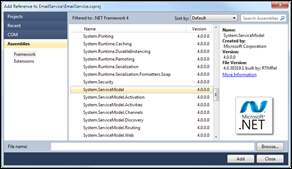
Now we need to tell WCF that this is our contract. We do that by adding attributes, but first we need to add a reference to System.ServiceModel. Right-click the project and select Add reference and select System.ServiceModel from the list. I’m using the Visual Studio 2010 Pro Power Tools so my screen might look different from yours, but the idea is the same.
Now you can add the attributes to your interface. On top of the interface place the ServiceContract attribute and on the operation place the OperationContract attribute. Add the using System.ServiceModel at the top of your codefile, or let Visual Studio do it for you by having your cursor in on of the attribute names. When you typed it in correctly and case sensitive, you can press CTRL + . and a context menu should appear to let you add the using automatically. Your interface should finally look like this:*
[ServiceContract] public interface IEmailValidator { [OperationContract] bool ValidateAddress(string emailAddress); }
Create the service implementation
Now that we’ve created the contract we need to write code for the service to actually do what we want it to do. Create a new class and make it implement the interface. After that, use a regular expression to verify the email address and return true value if it’s correct. You should have something like the following code, or make up your own. 🙂
public class EmailValidator : IEmailValidator { public bool ValidateAddress(string emailAddress) { Console.WriteLine("Validating: {0}", emailAddress); string pattern = @"^([0-9a-zA-Z]([-.w]*[0-9a-zA-Z])*@(([0-9a-zA-Z])+([-w]*[0-9a-zA-Z])*.)+[a-zA-Z]{2,9})$"; return Regex.IsMatch(emailAddress, pattern); } }
Now you have the two most important classes for your service. You don’t actually have to use an interface, but it’s a best practice. That way you can inherit multiple interfaces for or do versioning with different interfaces.
Creating the host
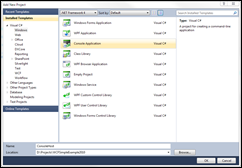
As said, for our host we’ll initially use a console application. Choose to add a new project and now have a Console Application as project template. Name it “ConsoleHost”.
Add the reference to System.ServiceModel again and also to your EmailService project. In your Main method, create a ServiceHost object and give it the correct arguments in the constructor, as shown below.
Type serviceType = typeof(EmailValidator); Uri serviceUri = new Uri("http://localhost:8080/"); ServiceHost host = new ServiceHost(serviceType, serviceUri); host.Open();
On line 4 is the creation of the ServiceHost object. As first argument it receives the implementation of our service as a type. And a base address as second argument. Read more about base addresses here and more about hosting here. The type is defined on line 1 and the base address on line 2. Finally on line 5 our host is started.
WCF4 : Default endpoints
Now here’s a difference in .NET Framework 4.0 because this is not possible in previous version of .NET. Currently the default endpoints are used, which is a new feature to make configuration of your services less of a hassle. I like to explicitly define everything in detail so everyone knows what happens. But for our example, this works quite well. If you’re not using .NET 4.0 you might want to continue to part 2 of this weblog post, which will be posted later.
You could add the default endpoints yourself by adding host.AddDefaultEndpoints(); to the code, right before the host.Open(); statement.
How can we see what endpoints are configured by default? I have a little script from way back that displays everything currently running. I won’t go into details, just paste the following after the host.Open(); part.
#region Output dispatchers listening foreach (Uri uri in host.BaseAddresses) { Console.WriteLine("t{0}", uri.ToString()); } Console.WriteLine(); Console.WriteLine("Number of dispatchers listening : {0}", host.ChannelDispatchers.Count); foreach (System.ServiceModel.Dispatcher.ChannelDispatcher dispatcher in host.ChannelDispatchers) { Console.WriteLine("t{0}, {1}", dispatcher.Listener.Uri.ToString(), dispatcher.BindingName); } Console.WriteLine(); Console.WriteLine("Press <ENTER> to terminate Host"); Console.ReadLine(); #endregion
Now you should be able to see the endpoints like in the first following screenshot. You can use a browser like Internet Explorer to go to the service uri and look at the default MEX endpoint.
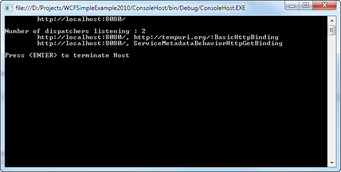
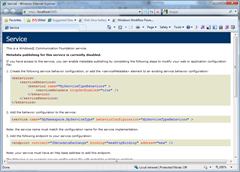
As you can see it’ll tell you that a MEX endpoint (aka metadata) isn’t configured yet. Now an easy way would be to do this via the new default endpoints. My first impression was that this would work.
Type serviceType = typeof(EmailValidator); Uri serviceUri = new Uri("http://localhost:8080/"); ServiceHost host = new ServiceHost(serviceType, serviceUri); host.AddDefaultEndpoints(); // This actually doesn't just simply work. host.AddServiceEndpoint(new ServiceMetadataEndpoint());
On line 5 you can see that we add the default endpoints and line 7 adds the ServiceMetadataEndpoint, or the MEX endpoint. Unfortunately it cannot add the Metadata behavior itself, so you still have to do this yourself. The other way it to specify in configuration that you want metadata enabled. Also new in WCF4 is that you can inherit configuration. You can specify in either the machine.config or in your local configuration what should be enabled by default for WCF services. I recommend you don’t do this in machine.config, but that’s just my opinion. Here’s how I enabled it in my project configuration, the app.config of our console host. Remember that in the follow up post to this, we’ll do this the old fashioned way, which will work in Visual Studio 2008 and has my preference.
<?xml version="1.0" encoding="utf-8" ?> <configuration> <system.serviceModel> <behaviors> <serviceBehaviors> <behavior> <serviceMetadata httpGetEnabled="True"/> </behavior> </serviceBehaviors> </behaviors> </system.serviceModel> </configuration>
As you can see, I have not specified a name for the behavior so in WCF4 this means it’ll be used by all services. This also means that every service needs a base address for http endpoints.
For reference, here’s the code for our console host:
static void Main(string[] args) { Type serviceType = typeof(EmailValidator); Uri serviceUri = new Uri("http://localhost:8080/"); ServiceHost host = new ServiceHost(serviceType, serviceUri); host.Open(); #region Output dispatchers listening foreach (Uri uri in host.BaseAddresses) { Console.WriteLine("t{0}", uri.ToString()); } Console.WriteLine(); Console.WriteLine("Number of dispatchers listening : {0}", host.ChannelDispatchers.Count); foreach (System.ServiceModel.Dispatcher.ChannelDispatcher dispatcher in host.ChannelDispatchers) { Console.WriteLine("t{0}, {1}", dispatcher.Listener.Uri.ToString(), dispatcher.BindingName); } Console.WriteLine(); Console.WriteLine("Press <ENTER> to terminate Host"); Console.ReadLine(); #endregion }
Accessing the metadata
Because we now have enabled our service and our metadata endpoint, the MEX endpoint, we can view it through Internet Explorer or another browser. Execute the console host (it has to be alive or the endpoints won’t be accessible) and browse to the URI of your service : http://localhost:8080/
If this shows a nice screen with a link to the WSDL you’re very likely done with the service.
Create client application
We’ll now add another project that will consume the service and will be able to verify if entered email addresses are valid, or at least according to our regular expression.
Add a new console application like before and this time call it ConsoleClient. Make sure your service (the host) is running, but don’t have it running in debug mode. Easiest way is to set the ConsoleHost project as startup project en press CTRL + F5 to run it without debugging turned on.
We now need a proxy class that sits between our client and service. There are two ways to create a proxy for our service. I have a preference for doing it manually, so you know what exactly is happening. I’ll show that first.
Manually create proxy
First start up a Visual Studio 2010 (or Visual Studio 2008) Command Prompt and move to the location of the ConsoleClient. Because it’s a Visual Studio command prompt you should have access to the proxy generator svcutil.exe. Input the following commandline
svcutil http://localhost:8080/ /o:ServiceProxy.cs /config:App.Config /n:*,ConsoleClient
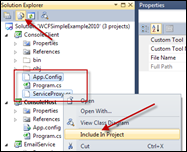
This should generated two files, the service proxy and an application configuration file. Go back to Visual Studio and in your ConsoleClient application make all files visible through the icon at the top of the Solution Explorer, as seen in the right screenshot. The App.Config and ServiceProxy.cs should become available and you can include these.
Update : The console window screenshot shows ConsoleHost as namespace, this is incorrect and should be ConsoleClient as the full commandline statement above states.
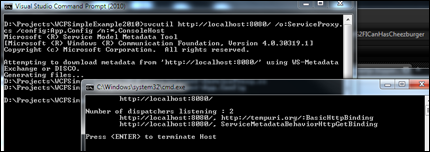
When we ran svcutil.exe the first argument was the location of our service as specified in the host. This is the base address. The second argument is what the tool should output, our proxy. The third argument is that we also want it to update our application configuration and if it’s not available, create it. The last argument is the namespace our proxy should be placed in (or should have), which should now be the same as our application itself.
Call the service
Now we can finally start consuming the service. When you go to your Main method in your Program class again, you can access the proxy class, which is the name of your service with Client suffixed. So ours is EmailValidatorClient.
EmailValidatorClient svc = new EmailValidatorClient(); bool result = svc.ValidateAddress("[email protected]");
In line 1 you can see the proxy being initialized. Does doesn’t mean the connection is set up, this is done on first call. Line 2 shows the calling of the service and getting the result back.
This is our entire method Main which will continue to ask for email addresses until you enter none.
static void Main(string[] args) { while (true) { Console.WriteLine("Enter an email address or press [ENTER] to quit..."); string emailAddress = Console.ReadLine(); if (string.IsNullOrEmpty(emailAddress)) return; EmailValidatorClient svc = new EmailValidatorClient(); bool result = svc.ValidateAddress(emailAddress); Console.WriteLine("Email address is valid : {0}", result); } }
Creating proxy through Visual Studio, the easy way.
Instead of creating the service proxy manually, via svcutil.exe, you can also let Visual Studio create it for you. Just right-click the project and select ‘Add Service Reference…’ You’ll get a dialog window where you enter the address of your service and the namespace.
Now we entered ConsoleClient as namespace, but it concatenates this to the already existing namespace. So now you can access the EmailValidatorClient via ConsoleClient.ConsoleClient.EmailValidatorClient. One of the reasons I don’t like to use this automatically generated proxy class. You should now not forget to add a using statement to this namespace at the top of your class. Probably a better solution is to set the namespace to Proxies or something, in the dialog, so the complete namespace makes more sense.
Run the client
While the service is still running (of not, restart it) you can right-click your ConsoleClient and select Debug and Start new instance and you’re done.
What next?
Next we’ll extend this blogpost with at least two more, step-by-step blogposts explaining how to manually add endpoints and how to host your service in IIS. You can read more about it here.
Download
Here’s the download for VIsual Studio 2010. In the follow up article a Visual Studio 2008 solution is available.
How to “EmailService project”. Please explane.
@Avi: WHAT?
If my host and client are in two different solutions , will that make any difference?
Even if you run them both on different computers it would work. That’s the entire point of WCF, connecting systems in a dstributed environment 🙂
Ah I should have posted my last question here on this updated tutorial. For a web service in sharepoint I declare the service factory and basichttpbinding in the svc file then deploy. Thus no need for settings in a config file. I can browse to the ***.svc/mex URL (enabled via attribute in service class) but not to the _vti_bin/xxx.svc file nor if I append the ?wsdl to it. I get the wsdl on the mex page. Would be nice to see details of the contract on the svc page in the browser. How could I enable this please? Thank you Dennis.
This is a fantastic tutorial for total Noobs who are new to both .NET and WCF. Case in point: me :). Working through an example like this is the best way to conceptually understand how WCF works. So Kudos to you, Dennis for putting this together.
very nice explanation, could you please expalin wcf with a good example, which covers every thing about wcf in a single application
Hi, i have an error in error list in EmailValidator.cs
it saying the name ‘Regex’ does not exist in the current context.
code as below, can you tell me what is the solution?
==
using System;
using System.Collections.Generic;
using System.Linq;
using System.Text;
using System.ServiceModel;
namespace EmailService
{
public class EmailValidator : IEmailValidator
{
public bool ValidateAddress(string emailAddress)
{
Console.WriteLine(“Validating: {0}”, emailAddress);
string pattern = @”^([0-9a-zA-Z]([-.w]*[0-9a-zA-Z])*@(([0-9a-zA-Z])+([-w]*[0-9a-zA-Z])*.)+[a-zA-Z]{2,9})$”;
return Regex.IsMatch(emailAddress, pattern);
}
}
}
@Leung : The Regex should be in System.Text as far as I know. It’s a static class in the .NET Framework. So if you can’t find it, something’s wrong with your setup. Might be incorrect .NET version, although very unlikely.
Anyway, just return true as it interferes with the WCF experience right now.
public bool ValidateAddress(string emailAddress)
{
Console.WriteLine(“Validating: {0}”, emailAddress);
return true;
}
I also got the same error. Even though .NET 4.0 should have it by default; i.e. System.Text
You can add one more reference to resolve the issue.
using System.Text.RegularExpressions;
That’ll take care of the issue.
Excellent tutorial! Very useful for someone (re)starting .NET, VS and WCF. Thanks.
Thankyou Dennis!!!
Very simple and descriptive tutorial…
Awesome 🙂
Excellent tutorial for WCF beginner
woopieeeeee
I spent about a week looking for a very concise, simple explanation of WCF and then I found your site. Thank you very much!!!!
Thanks for the great articles Dennis!
I have one question: what would be the way to to create a function in the ConsoleHost to process the input from the Service application (instead of processing the input directly in the service application object)?
Fantastic!
The best self-hosting WCF “getting started” tutorial I have seen!
Nice article. I am new to c# and WCF.
I am kind of lost in this step
Type serviceType = typeof(EmailValidator);
The type or namespace emailvalidator is not found are u missing a using directive or an assembly reference) ?
So I know that I need to add referemce to ConsoleHost from WCFSimpleExample2010 how can I do that?
And also I read in your replies that I can do this in 2 differnt computers lets say I created WCFSimpleexample2010 in one system and ConsoleHost in another system how can I add the reference to it?
please let me know
Thanks,
Sherry
I added the reference and I can add only IEmailValidator and If I add EMailValidator I am getting error message.
Thanks for really easy example.
1- I know the concept of your project is same as the WCF project but why you didn’t new a WCF project and used console application?
2- Do you know how we can connect to SQL via Entity Data Model in addition to WCF service, because I want develop an application which can to get some information via WCF and then save them in SQL via Entity Data Model. If there is some useful link please send me or share it here.
thanks
azizi
[email protected]
@Sherry : Have you got a class EmailValidator at all? Do you have casing right, because you’re writing EMailValidator while it should be EmailValidator.
Put your cursor on the word EmailValidator and press and hold the CTRL key and then press the . key (while holdering CTRL). A context menu should appear, asking you to either create a class (which is wrong) or add a using statement for the EmailValidator. That should do it.
The console application is just to get WCF up and running. You can also let IIS do this for you. What you really need is the IEmailService for specifying which operations should be visible/usable on the service and of course EmailService, because an interface alone doesn’t do anything.
But you need WCF being activated on both sides. I did it with a console application, and than you need a console app on both sides. One for sending a message, one for receiving a message. But you can also do this in Windows Forms, WPF or whatever. The receiving side however is, most of the time, in IIS or in a Windows service.
@azizi:
1- Because I like to be in control! 🙂 And also because when you start completely blank, it’s easier to explain what really is happening. When Visual Studio already generates tons of code and config for you, it’s harder to explain what you actually need.
2- There’s a ton of info out there and it depends on what you need. But WCF RIA of Data Services or whatever already helps a lot. But you can also just transfer the EF entities over the wire, because they can be serialized by WCF.
i face a problem during the proxy creation manually and also with easy way..,pls help me….
the problem as follow –
/// error in visual studio 2010 commmand prompt
WS-Metadata Exchange Error
URI: http://localhost:8080/
Metadata contains a reference that cannot be resolved: ‘http://localhost:808
0/’.
There was no endpoint listening at http://localhost:8080/ that could accept
the message. This is often caused by an incorrect address or SOAP action. See In
nerException, if present, for more details.
Unable to connect to the remote server
No connection could be made because the target machine actively refused it 1
27.0.0.1:8080
HTTP GET Error
URI: http://localhost:8080/
There was an error downloading ‘http://localhost:8080/’.
Unable to connect to the remote server
No connection could be made because the target machine actively refused it 1
27.0.0.1:8080
There’s a problem with the service.
Make sure you have a MEX endpoint in your config and try to access the http endpoint via a browser.
Nice article
I am getting following error when I run the ConsoleHost Application.
Error :
Service ‘EmailService.EmailValidator’ has zero application (non-infrastructure) endpoints. This might be because no configuration file was found for your application, or because no service element matching the service name could be found in the configuration file, or because no endpoints were defined in the service element.
Please help me.
Thanks,
Amit
Very good tutorial, well explained, thank you.
ThanX Dennis,
a very good example and lotZ of help for one to dive into WCF.
Hello,
Iam creating all 3 projects.. when iam running svcutil.exe .. it is creating file… but its not showing in console client project.. do i have to add manualay it comes automatically in the projects.. once utility is run..
Please help
ok tanx for informing me.thank you
Came across this fine example. Had a play and works well. Possibly MS needs to develop a higher level using drag-and-drop tools onto a form. The more I get into this (and always had a fascination with distributed computing), the more balls I seem to have in the air. It’s certainly different from standalone Win Services, remoting, channels, etc. Question though: How is this placed with respect to Service Broking and MS SQL Server? Can I contract directly into MS Server avoiding some of the trappings of ADO.Net, possibly using Linq?
However, great work. Love the clarity of writing and explanation. Thx Dennis.
Hi,
I did exactly what is written above. (until “Accessing the metadata” part ) when I type to the browser http://localhost:8080/ page didnt show up. What is the problem and how can I fix this?
@Tugce: So many possibilites, that I can’t think of anything specific when you provide me so little information. Sorry! 🙁
@Quen: Don’t know if I have every answer and if you’re looking for the answers I give you.
– Service Broker is a queueing technology that is WAY harder to get into than WCF with MSMQ or nServiceBus or so. I’d ditch Service Broker if I were you.
– SQL Server has nothing to do with WCF. SQL is a data store, WCF is a communication mechanism.
– If you want to access data, this has also nothing to do with WCF. I’d use Entity Framework if you’re going for Microsoft, or nHibernate if you up for it. Both technologies need a lot of investment to gain knowledge.
About the channels etc, that’s what WCF uses. Not sure what you mean. If you mean .NET Remoting, it’s dead. You can use TCP/IP with WCF as well.
Windows Services are a way of hosting your application. They can host WCF services as well. But if you have IIS7 and WAS (Windows Process Activation Services) it’s probably VERY unwise to host them yourself in Win Services.
I would really like to understand this but it suffers from a very common disease – it assumes the reader can read minds and is really out of touch in understanding what a beginner needs explaining. – I am fine with the instructions to open new project and solution from the WCF templates (except that VS2010 offers no option for ‘class library’ as stated inn the text – only ‘wcf service library’ is an option – so I choose that – the next statement in the tutorial is ‘now create a contract’ – be useful to explain how, why or what. I managed to guess I had to right click in solution explorer and add something new. When I did I couldn’t find anything called a “contract” in the list of templates only WCF service class or -(eureka) ‘interface’ (not what was written in your tutorial)
so I got there – I am using VS2010 v10 sp1 – is it that this tutorial is based on something planetarilly different? or is the writing a rushed job skipping the boring steps –
Sorry to complain -you’ve got lots of warm fuzzies from others which I am sure you richly deserve if only for taking the effort to publish this but if you see yourself as a teacher and you are pitching this at noobies then perhaps the getting started phase deserves more attention.
surely it is not the most difficult thing in the world to document exactly what steps take you to what point?
Hey John, the writing is most certainly not a rushed job. But if you’re not sure about “Class Library” and all, perhaps it’s not wise to start with WCF. It’s pretty complex. This and my other tutorial on WCF, are some of the most easy and complete you can find. If not, let me know which one you found more comfortable.
When I have time, I’ll have a look at it again.
I just stepped over your new WCF articel and as far i can see now its great! This will safe me some time!
Thx alot!
@John: Meybe Dennis’ way to explain the contract is not straght forwared. I was irritated too, but if you read just a few line more you’ll find the ServiceContract which was meant.
Hehehehe, I changed it a bit. Hope it’s more clear now.
@Sherry
If you can’t see the EmailValidator class, it’s because you forgot to put “public” in front of the class definition.
Just add it, and you’ll be all set.
Hi Dennis,
First,I want to thank you for this great tutorial.
I’ve followed all the steps and everything has been fine till now.
I’m trying to create proxy whith Visual Studio 2010 (the easy way). I’ve the “Add Service Reference” window open and I’ve entered the address:
http://localhost:8080/.
When I click on Go, I get this message:
An error occured while attempting to find services at ‘http://localhost:8080/’.
Maybe did I forget something? or maybe did I mistake somewhere? Do you have an idea?
Thanks.
@Bamboula36 : Could really be anything, but I’m 99% sure there’s something wrong in the configuration. Did you add more than in the example code? Did you download the example solution?
I follow your article step by step up to the display of the dispatchers which display correctly but my browsers are displaying server not found when i type the uri into them i.e http://localhost:8080/. I have checked all browser settings. I want to get this done before progressin with the tutoria. Thanks.
Johnson
[email protected]
@Johnson : Did you add the “httpGetEnabled” attribute in your configuration? That’s the part that enables browsers to look at the wsdl
I went through the example, but my project doesn’t load, I’m using VS 2008. Do I have to use VS 2010 for it to work? Thanks.
No, you should be able to use VS2008 for this. Just the supplied downloadable solution won’t easily load in VS2008 🙂
Straight on, the service wouldn’t start until I started VS2010 “run as administrator”. This wasn’t mentioned in the narrative.
In the section about adding the mex, you did not specify that you had to actually CREATE an app.config file in ConsoleHost. That slowed me down. After finally adding one and retrying svcutil, that worked. Another missed step was that you didn’t specify that you had to add a reference to ServiceModel in the ConsoleClient. These two things, coupled with the step mentioned in my previous post, made this example take hours to try instead of minutes. It did finally work as advertised.
@Dennis S: Thanks for the heads up, I’ll see if I can revision the article to make it more clear.